
- Injog and Break
- Overhand Break Control
- Overhand Lift Shuffle
- Lift Shuffle Force
- Spread and Break
- Holding a Break
- Spread and Break Control
- Tricks with the Overhand Shuffles
Injog and Break
The drawback to the undercut and throw, after jogging a card in the overhand shuffle, is that frequent repetition would reveal to a keen observer the fact that only half of the deck is being shuffled. To obviate this difficulty, recourse is had to the formation of a division between the jogged card and the cards below it, which are to be kept intact and returned to the top of the pack. This division is termed a break, and the method of forming it is as follows:
- Undercut half the cards, injog the first card, and shuffle off in a manner already explained.
- Preparing for a second overhand shuffle, pat the upper side of the deck square with the flat right fingers, then place the right thumb against the end of the jogged card and the right middle finger against the outer end. Press the thumb upwards and inwards, bending the protruding end of the jogged card upwards as it enters the pack, thus making a division or break between it and the cards below it.
- Grip the whole pack firmly between the right thumb and middle finger, lift it, and begin another overhand shuffle in the usual fashion. Shuffle freely until the break held by the thumb is reached, then throw the whole of the packet below it on the top in one block. Thus the same result follows as that obtained by the undercut; apparently the deck has been freely shuffled twice.
We have found that most beginners cannot learn this sleight from a printed explanation, whereas an ocular demonstration enables them to do it in a few minutes. The difficulty seems to be in understanding the action of the thumb on the jogged card, with the result that it is pushed flush with the other cards and so lost. To avoid this fatal error, let the tip of your thumb touch the end of the jogged card and rest it there for a fraction of a second. Then, as you press your middle finger against the outer end of the deck, push the end of the jogged card upwards and inwards, and the break will be formed automatically under the thumb as it presses firmly against its end of the pack. [Note: This observation about the difficulty of learning from text alone highlights the tactile nature of card manipulation – these techniques require physical practice to master – RJW]
Overhand Break Control
This method of controlling a card returned to the pack is the same as the overhand shuffle control already given, save that in this case the injog and break is used in place of the undercut.
- After a card has been selected, begin an overhand shuffle and, when about half the cards are in the left hand, extend that hand and have the chosen card placed on top of those you hold.
- Run three cards flush on top of the chosen card, injog the next card, and shuffle off.
- Perform the action described in step No. 3 of the injog and break; that is, form a break under the jogged card with the right thumb, by bending the protruding end of the card upwards as the right hand takes the pack.
- Shuffle off the cards above the break, and drop the cards below it on top. The chosen card is four from the top.
- If your trick requires the placement of the chosen card at the top, you can shuffle the four top cards to the bottom, injog the next card, and shuffle off. Form a break at the injog, shuffle down to it and throw the four bottom cards on top–in other words, repeat the overhand break control shuffle.
Overhand Lift Shuffle
To a certain extent the same objection that we have noted with regard to the undercut and throw method applies to the use of the break. If used constantly without any variation it would be possible to detect the fact that a portion of the deck is kept intact. The lift shuffle obtains the same result as both the preceding methods in one shuffle and is therefore the most perfect partial false shuffle extant. Here is the method:
- Let us suppose that a small number of cards, up to say eight or ten, must be retained intact on the top of the pack in the course of an overhand shuffle. Begin by lifting the whole pack with the right hand, holding it by the ends between the third (top) phalanges of the thumb and middle finger.
- As the first movement of the shuffle, pull off these cards into the left hand. Bring the deck down on top of this packet (A) and pull off another packet (B) with the left thumb. At the same moment that the deck strikes the left palm, press the tip of the right ring finger against the end of the first packet (A), pressing its inner end against the right thumb at the second joint and thus holding it firmly.
- After releasing packet B, lift the right hand, carrying away the remainder of the deck and packet A gripped between the ring finger and the thumb. Packet B completely conceals this move (Fig. 67).
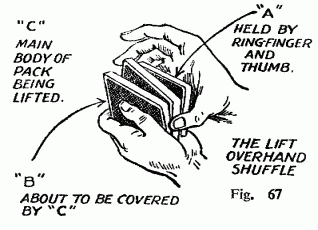
- Continue the shuffle until all the cards between the middle finger and the thumb have been shuffled off, then drop packet A intact on top of all the cards in the left hand.
A few minutes’ practice will enable you to make this lift of the special packet smoothly and imperceptibly. We know of no other sleight in the whole range of card conjuring which is so valuable and so easily learned. A judicious mixture of the shuffle and undercut (overhand shuffle control), the shuffle and break (overhand break control), and the shuffle and lift (overhand lift shuffle) will baffle the keenest and most skeptical observer.
Naturally the top card can be controlled in this way just as easily as can a small number, but this is only one of the several uses to which the sleight can be put. A very effective use is for gathering several chosen cards and retaining them on the top of the deck, although they are replaced separately and the pack is shuffled each time. To do this, start with the deck in the left hand. Undercut the bulk of the cards with the right hand, and thrust forward the left for the replacement of the chosen card on top of that packet. Then execute the lift sleight in the first movement of the overhand shuffle, and finally drop the lifted packet on top of all. Repeat the moves for the remaining cards, and you have all the chosen cards on the top of the pack. Remember, however, that the order they are now in is the reverse of that in which they were replaced. [Note: This gathering technique allows the performer to collect multiple selected cards while appearing to lose each one in the shuffle – a powerful tool for multi-card revelations – RJW]
Lift Shuffle Force
It is often necessary to compel a spectator to take a certain card. This is termed forcing, and there are a number of ways in which it can be done, some of which will be discussed later. It must always be borne in mind that a force is only successful when the spectator is convinced that he has had a free choice. If he has any suspicion that he had been made to take a certain card, then the glamour of its later discovery is tarnished. The lift shuffle affords a method of forcing that is not only easy but also convincing. [Note: This insight about the psychology of forcing remains fundamental to modern magic – the spectator’s belief in their free choice is essential to the effect’s impact – RJW]
- Have the card to be forced on the top of the deck; shuffle it to the bottom and back to the top.
- Tell a spectator that you are about to shuffle the cards, and request him to call “Stop” at any moment that he pleases. Execute step No. 2 of the overhand lift shuffle.
- Continue the shuffle without pause, taking off cards with the left thumb in small packets. At the moment the spectator calls stop, bring the right hand down and release the lifted packet on top of the cards already in your left hand, as you say, “Here? Very well.”
- Extend your left hand to him to take the top card of that packet, that is to say, the card to be forced.
The action is so natural that many of the best cardmen use this force in preference to any other. It should not be necessary to reiterate that you must not look at the cards while shuffling. Keep your gaze fixed on the spectator, watch his lips, and you will note the exact moment he is about to call stop and act accordingly. [Note: This advice about reading the spectator’s lips to anticipate the “stop” command shows the psychological subtlety required for effective forcing – timing is everything – RJW]
By having several cards that are to be forced on the top of the deck, you can force them in rapid succession in the same way. When the first card has been taken, place the cards in your right hand under those in your left, and simply repeat the procedure with a second and third spectator.
Spread and Break
A modern and inartistic way of controlling a card after its replacement in the pack is to cut off half the cards with the right hand and thrust out the left hand for the spectator to place his card on the left-hand packet. The cut replaced, the tip of the left little finger is inserted secretly between the two packets, that is, above the chosen card. This method is bad, first, because the spectator is given no choice as to position in the placing of his card, and, second, because the bending of the little finger is generally noticeable.
Instead, spread the cards fanwise with both hands, in the same way as when offering the pack for the selection of a card. Move your hands toward the spectator as you ask him to replace his card. At the moment he is about to do this, make an opening in the middle of the spread (Fig. 68), reach forward and take his card as with a forceps, by closing the cards on it and immediately drawing your hands back. The insertion of the left little finger between the packets will be covered completely in the action. 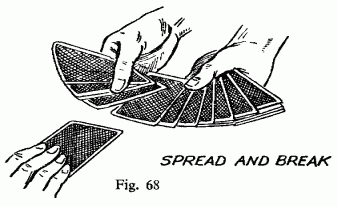
Holding a Break
When a break is made by the insertion of the tip of the little finger, a common error is to hold the break in the same way, that is, by keeping the little finger tip inserted between the two portions of the pack. The correct procedure is this:
When the break has been formed by the insertion of the little finger tip, square the deck with the right hand, the fingers at the outer end and the thumb at the inner end. Grip the pack momentarily with the right thumb and fingers, holding the break with the thumb, and withdraw the little finger. Immediately press it against the side of the deck as in Fig. 69. 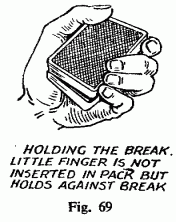
It will be found that the break can be held quite securely in this way, and the right-hand side of the deck can be shown freely as well as the outer end. The holding of the deck, therefore, appears to be perfectly regular. This is most important, since the break is of great use in card conjuring and to hold it correctly is essential to clean manipulation. [Note: This transition from finger-tip break to thumb break lets you gesture with your left hand, and then grasp the deck with the left hand and show the right. This subtlety disarms the spectator – RJW]
Spread and Break Control
When a chosen card has been returned to the pack and a break above it has been secured by the left little finger, it can be brought to the top of the deck easily and quickly in the following manner:
- Square the ends of the pack with the right hand, then grip it firmly between the right thumb at the inner end and the fingers at the outer end, the thumb holding the break (Fig. 70).
- Change the grip of the left hand by seizing the left side of the deck at the middle, near the edge between the tip of the left thumb on the back and the tips of the fingers on the face.
- Maintain the pressure of the right thumb and fingers on the ends of the pack, and with the left hand turn the left side of the deck downwards to the regular position for an overhand shuffle (Fig. 71).
- The break will be retained by the pressure of the right thumb, and you go at once into an overhand shuffle. Shuffle freely until the break is reached, then throw the remainder of the deck on top, bringing the chosen card to the top of the pack.